A Happy Customer Build (thanks Bill!) 4/2004


--- Bill
>wrote:
> Hey Jon--
>
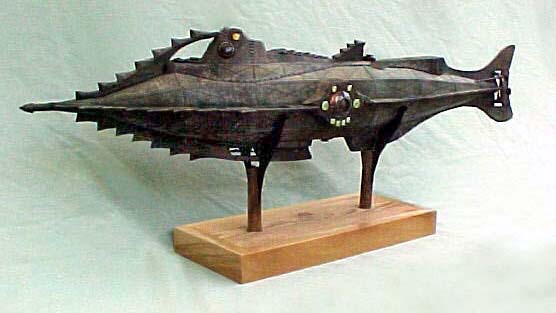
> Just a quick note to say my Nautilus model arrived
>
> this weekend. I started
> to build it yesterday at 9am and the next
>thing I
> knew it was after
> midnight. It's going together pretty well.
>I've
> finished the main shell
> and most of the superstructure. So far no
problems,
although I admit I did
cheat a bit and cut cardboard forms to
wrap the tail sections around. They
came out nice and sturdy.
I'm building it for a friend for his birthday so I
want to make it as
special as possible. Do you know of anything
readily available (plastic
or glass) to replace the large ocular windows? The
paper ones are nice, but my friend is the type
who would ask, "Why can't I see inside?"
>
>
All the best--
>
> Bill >
> At 01:30 PM 4/13/2004 -0700,
Attachment
=========================================================
At 12:02 PM 4/19/2004 -0700, you wrote:
Oh, I'm so glad its going well. Please do send a
picture or two, when its done. Now ready to be
blown away? Go to the craft store and the stuffed
animal section they have the googly eyes in all kinds
of sizes. The kind that were on the stuffed animals
in the 1960's, with a floating black disc for a
pupil. Cut out the back white section, throw out the
back disk, and tada a really cool see through parlor
window. Another option is the $0.50 gumball machine
plastic egg container, or possibly an actual egg
carton made out of clear plastic. Anyway, for a
clear view just mount, or you can smear petrolum
(sp?) jelly (vasoline) on the inside of the window
for a fogged effect. And now for your present for
sending me some great pics (8)))
directlink:
http://realtylinkonline.com/test2/window03a.jpg
you will have to resize, cut, play, and put behind
the window, but this should put your pal in his place.
Best of skill,
Jon
=========================================================
Hey Jon--
Well, my model is just about finished, though I'm
still tweaking it here
and there. I think my friend will be pleased.
Thanks for the info on the google eyes and the 50-cent
toy bubbles. I
ended up using both-- as well as one of the interior
pictures of the salon
and one of the wheelhouse.
I enjoyed the build with the possible exception of the
side fins. They
were very frustrating to make, particularly for a
"perfectionist" like myself.
I especially liked how adaptable the model was for
enhancements. Using the
plastic bubbles for the wheelhouse spotlights, for
example, allowed me to
add the "eyelids." I also used the google eye pupils
to make wheel handles
for the hatches. I'm thinking of adding wire rungs to
the wheelhouse
ladders and maybe some surface detail to the lifeboat.
Then again, it
looks so good right now, maybe I should leave well
enough alone!
So, what exactly is the background to the model. Did
you develop it
specifically for a competition? Did you create it in
a computer?
I'm attaching digital pictures. Unfortunately, my
camera is an older
model without much detail.
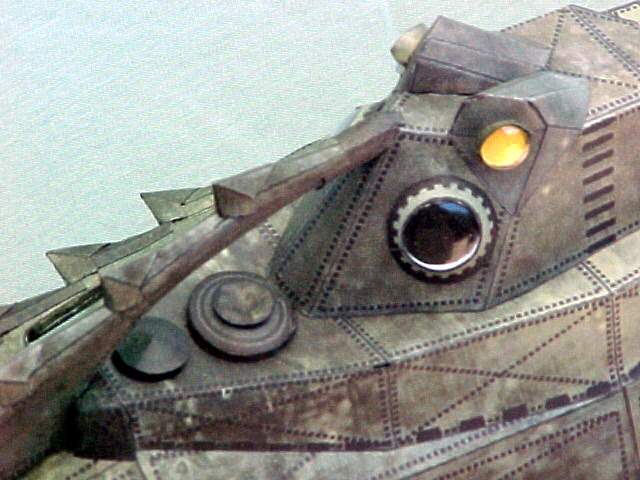
The wheelhouse photo shows the use of the google eye caps. I couldn't
figure out a way to photograph it, but you can look into the front
portholes and see the picture of the interior. I regret I didn't make a
separate helms wheel and put it so it could be more easily seen through
portholes. I had everthing glued into place before I checked the stills
gallery on the DVD. There's a great shot of James Mason standing on deck
outside the windows with the steering controls clearly visible.
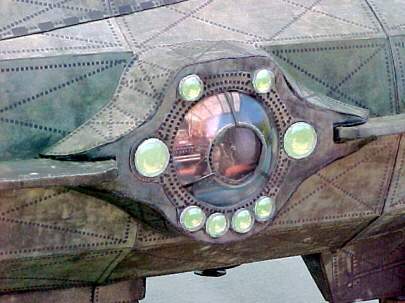
The view of the oculus window shows more goggle eye caps and also the
plastic toy bubble. The latter turned out to be quite brittle, especially
as I wanted to replace the natural curve with a flat surface. I made 5
windows before I found two that I was happy with. I first hand-bored a
large pilot hole into the bubble and then used a conical grinder to ream
the opening out to the proper size. The front plate was cut out of heavy
plastic. I wanted to reproduce the leaded glass look so I made a paper
channel and glued it around the edge of the plate (the same technique as
stained glass, but using paper instead of lead.) The paper edge gave me a
good gripping surface to allow attachment to the rest of the bubble. I
finished it off by gluing the other three seams to the surface of the
bubble. The window protrudes through a hole in the window housing. This
allowed for gluing on the inside (where it's better hidden) and also a
better sense of depth as the salon picture is mounted to the curved side of
the Nautilus.
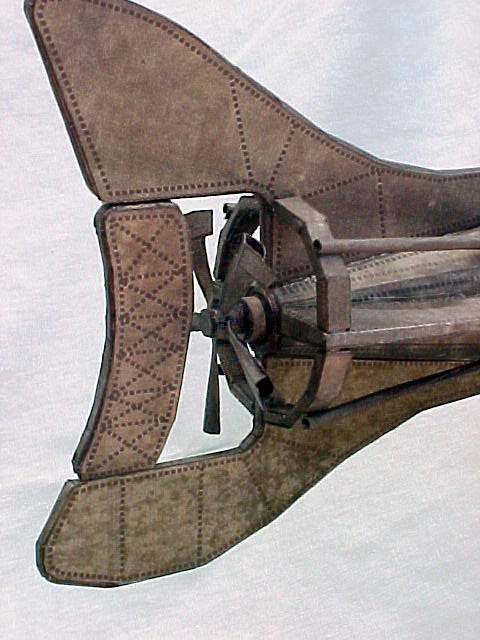
The picture of the tail assembly shows my attempt to beef up the propeller
to recreate that great twisted wedge look that can be seen in the scene
where the rudder is being repaired.
The final picture is of the "speedometer". That little squiggle always
fascinated me as a kid and I knew I had to try to include it.
Unfortunately, I couldn't figure out a way to make an accurate worm gear
out of paper, so I settled for a paper coil wrapped around a piece of wire.
All the best--
Bill